
Introduction
Next.js is a popular JavaScript framework that allows developers to build web applications with server-side rendering, automatic code splitting, and optimized performance. However, deploying a Next.js app can be challenging, especially for those who are new to web development. One solution to this problem is to use cPanel, a web hosting control panel that allows users to manage their website and server in a user-friendly interface. In this article, we will discuss how to deploy a Next.js app in cPanel, providing step-by-step instructions and tips to help you get your app up and running quickly and easily. By the end of this article, you should have a solid understanding of how to deploy a Next.js app in cPanel and be ready to launch your app on the web.
what is cPanel
cPanel is a web hosting control panel that provides a graphical interface and automation tools to simplify the process of hosting and managing a website on a server. It is a widely used platform that allows website owners to manage various aspects of their website, such as creating email accounts, managing databases, installing software applications, and monitoring website traffic. With cPanel, users can perform these tasks without the need for extensive technical knowledge or experience, making it an ideal solution for beginners and advanced users alike. Many web hosting providers offer cPanel as a standard feature, and it has become a popular choice for website management and hosting.
what is Next.js
Next.js is a popular open-source JavaScript framework used for building web applications. It is built on top of React, a popular JavaScript library for building user interfaces, and provides additional features such as server-side rendering, automatic code splitting, static site generation, and more. Next.js is designed to provide a seamless experience for developers and users, with optimized performance, SEO, and scalability. It allows developers to build complex web applications with ease, while still providing flexibility and customization options. With its powerful features and ease of use, Next.js has become a popular choice for building web applications of all types and sizes, from simple static websites to large-scale enterprise applications.
Steps to deploy Next.js app in cPanel
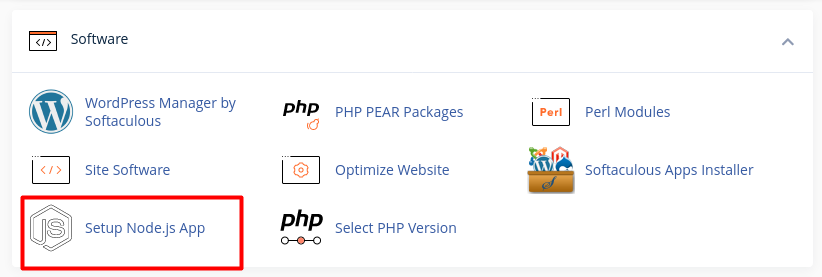
Check if you have nodejs in your cPanel
Before you begin, make certain that your hosting provider installed node js application manager, you will find it under the name of Application Manger or Setup Node.js App as it shown it the images :

Create a standalone folder
we need to modify our next.config.js by adding :
module.exports = {
  // other configuration
	// ...
  output: 'standalone',
}
this will build .next/standalone production version of your Next.js application when we will run yarn build or npm run build, the framework will automatically trace each page and its dependencies to identify all the necessary files. which can be deployed without requiring the installation of node_modules. For detailed information on this feature, please refer to the Next.js documentation.


Zip the needed folders
after building our app and get .next/standalone folder we will need to add some folder to it so it can run alone
- add
publicfolder to.next/standalone(if it already exisit instandalonefolder remove it and add the orignal one) - move
.next/staticinside.next/standaloneand that's all now you can zip.next/standaloneand upload it to your cPanel and unzip it there
to automatize this step you can use this script :
#!/bin/bash

NODE_ENV=production
rm -r out out.zip
yarn build && mkdir out
cp -r ./.next/standalone/* ./.next/standalone/.next ./public ./out
cp -r ./.next/static ./out/.next/static
mv ./out/server.js ./out/app.js
zip -r out.zip ./out
explantaion:
- declarte
NODE_ENVas production to get best output from nextjs - remove old exiting build (the build will be in
outfolder) - we build our app and create
outfolder where we will move ourstandalonefolder content - we move
.next/standalonecontent and./publicto./out - we move
.next/statictoout/.next/static - in last step we zip our
outfolder
luanching the app
after uploading the zipped folder that we have created we unzip it and keep in your mind its location.
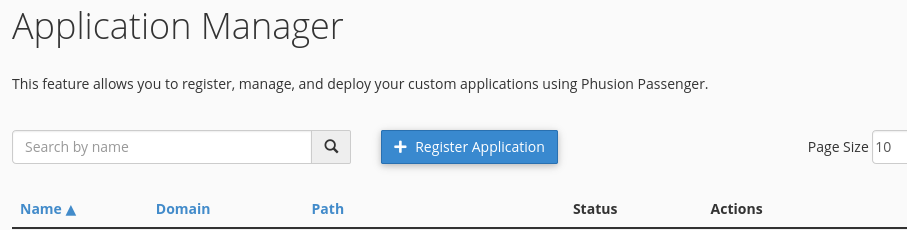
go to Application Manger or Setup Node.js App
with Application Manger
click on Register Application
and we fill this formulair
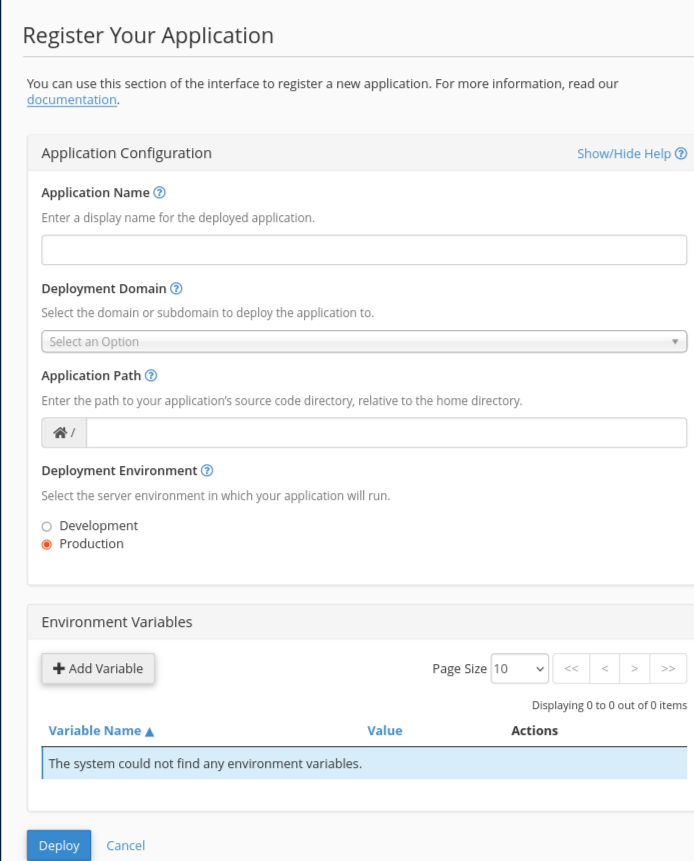
and finally we click deploy and it will run
Static Deployment Instructions
To deploy your Next.js app as a static app, follow the steps below:
- Ensure that none of your pages use getServerSideProps or getStaticProps functions.
- Disable image optimization by adding the following lines to your next.config.js file:
/** @type {import('next').NextConfig} */
const nextConfig = {
  // ...
+  images: {
+    unoptimized: true,
+  },
};
module.exports = nextConfig;
- Change the output mode inside next.config.js to:
const nextConfig = {
  // ...
+ output: "export",
  images: {
    unoptimized: true,
  },
};
After completing these steps, your application will be transformed into a static file located in the /out folder. Next, you can compress the folder into a zip file and proceed to upload it to your server, specifically to the appropriate directory in your cPanel. There is no requirement for Node.js or any application manager. Simply host the files within your desired folder, and your static app will be ready to serve.
thanks for reading till the end
what of static deploy